Welcome to the comprehensive guide that unravels the intricacies of Microsoft Excel 2003. Whether you’re a novice or a seasoned user, this full guide is your roadmap to harnessing the full potential of Excel 2003. Explore step-by-step instructions, tips, and tricks to elevate your spreadsheet skills and streamline your data management journey. Master Excel 2003 with ease company records, salary sheets, and all office-related work can be done easily.
About Microsoft Excel 2003 Window
The Excel window provides various features in the form of toolbars for working with worksheets. So that using these toolbars you can easily get the conclusion of the work done in the worksheet.
About Work Book
The file that opens in Excel is called a worksheet. One can take from 1 Sheet to 255 Sheets in a workbook. In this sheet, we collect our information. For this reason, this program assumes extraordinary importance based on its features. Because of this almost today in the office of the whole world, regardless of which department they belong to. Microsoft Excel 2003 has its uses somewhere.
How to Open Microsoft Excel 2003
To open Microsoft Excel 2003, first, click on the start button and click on the Program option. A list of programs will appear in front of you. Which Microsoft Excel 2003 program will open in front of you as soon as you click on MS Excel. Explaining each part of the screen and its functions in detail in Microsoft Excel 2003.
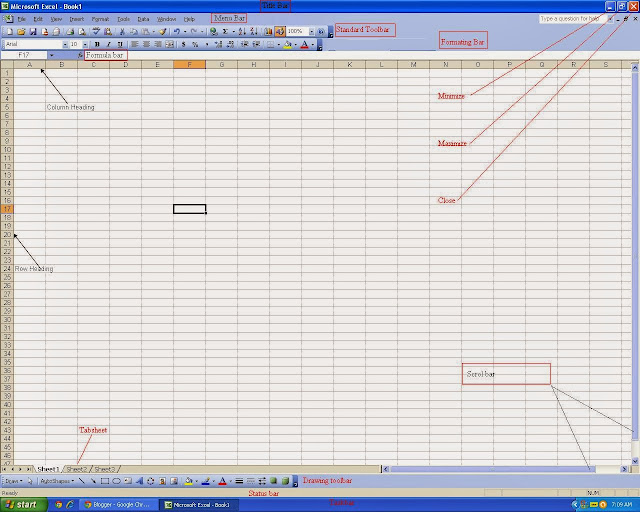
Title Bar: Microsoft Excel 2003
It has the program and file name on the left side. On the right side, there are Minimize, Maximize, and Close buttons.
- Minimize: By this, the program is minimized and placed in the taskbar as an icon. Then click on that icon again to open the program. In this way, we can minimize many programs and keep them in the taskbar.
- Maximize: This Microsoft Excel 2003 program can be spread on the whole screen.
- Close: Through this, the program can be closed. If you haven’t saved your file. Then a popup to save will come, if you want, save the file by doing yes. Otherwise, skip by doing No.
Standard Toolbar

This toolbar is below the Formatting toolbar. There are different types of options in the form of icons. If you want to open a new file, you can open it by clicking on the New icon. Similarly, you can print a preview and print out the page. You can also save the file.
Formatting Tool Bar

In Microsoft Excel 2003, you can select the font style of your choice. You can make the font size as promised or as small as you want. You can set the paragraph. You can change the font color etc. Fonts can be bold, italic, and underlined.
Formula bar:
In this box, the facility of making changes in the text present in the selected cell is available. Similarly, by using the formula in the formula bar, we get the result of addition, subtraction, multiplication, division, etc.
Method: First of all select the cell in which formatting is to be done. After this, click on the box of the formula bar and enter after formatting.
Name Box:
This box contains information about the selected cell. What are the column name and row number of the selected cell? Eg- A1, B2, C3, etc.
Data Entry Area:
The original page is the sheet in Microsoft Excel 2003. This is called a spreadsheet. In which we do all the work related to the office. This sheet consists of columns and rows.
Scrollbar:
Through this, you can move the page up, down, right, and left. There are usually two scroll bars on a page. In the vertical that is on the right side of your page, you can slide the page up and down. And with the second horizontal, you can slide the page to the right and left.
Status bar:
In Microsoft Excel 2003 programs, status information is available in the status bar. For example, NUM is a sign that the Num Lock is on the keyboard. Similarly, the solution of SUM and Average also appears in the status bar.
Drawing Tool Bar:
In Microsoft Excel 2003, there are many options related to text and boxes in the drawing toolbar. With which different types of changes can be made in text and box. Clicking on Draw on the left in this bar will show a chart. Which has the following options.

- Group: Through this option, you can create a group by selecting many objects.
- Ungroup: By this option grouped objects can be separated.
- Regroup: Through this option, ungroup objects, etc. can be grouped again.
- Order: Under this, there are the following options.
- Bring Front tow: With this option, the select object can be brought up.
- Send to Back: By this option, the select object can be brought down.
- Bring Forward tow: By this option, the select object can be brought up one by one in sequence.
- Send Backward: The object selected by this option can be lowered one by one in sequence.
- Bring Forward two of text: By this option, the selected object can be brought above the text.
- Send Tow Behind Text: The object selected by this option can be placed below the text.
Grid: Microsoft Excel 2003
In Microsoft Excel 2003, the “Grid” plays a pivotal role in enhancing the visual organization of data. This fundamental feature ensures a structured and systematic display, aligning cells and aiding readability. The grid not only provides a visual guide for seamless data entry but also contributes to the overall clarity of your spreadsheet, optimizing user experience.
- Nudge: The selected object can be moved from top to bottom right-left. This work can also be done through Arrow Key.
- Align and Distribute: On clicking this option, a bar will open in Microsoft Excel 2003. In which the above options will start only after clicking on the bottom option Relative to page. By which the select object can be moved to the top-right-left of the top of the page.
- Rotate or Flip: By this, you can rotate the selected object as per your wish.
- Text wrapping: It is used to place the object in the article as per its wish. So that the text uses how the variables come around the object.
Reroute Connector:
The long connector between two objects will shorten the line by automatically adapting it to the shortcut. It will start when we make two or more boxes inside the drawing canvas area and connect them through a connector line.
Method: On selecting any object from the drawing toolbar, a box with a cut line will appear on the page. Which is called the drawing canvas area. Right-clicking on this box will open a bar of options. Clicking on the Show Drawing Canvas toolbar will bring up a toolbar named Drawing Canvas. The setting of the canvas area can be done by the option present in it.
- Edit Point: By this, you can bend the line as per your wish.
- Change Auto Shape: Through this option, you can change the selected box into different designs.
- Set Autosahpe Defaults: By filling in the box color and clicking on this option, now whenever you make a box, the same color will always come.
- AutoShapes: Clicking on this will open a bar with different shape names. In which the designs related to different shapes are present. By clicking on which of these shapes you will draw on the page, then the object will be prepared in the same form.
Taskbar:
On the left side of this bar is the Start button. By which we can open the program. Minimize the open program and keep it in the taskbar as an icon. And you can open it by clicking on that icon again. In this bar on the right is the clock. You can change the time and date by double-clicking on it.
Note: To link more than one text box and move the box in a different direction. The following uses the Toolbox tool. If this tool is not shown when you create a text box, then you can turn on the tool by clicking on the text box under the Toolbar option in the View menu.
MenuBar:

In Microsoft Excel 2003, this bar contains various menus. There are many options under all menus. Which can be run by clicking with the mouse. Read all menu details carefully in the next post. You can free download Microsoft Excel 2003 from getintopc.com or filehorse.com.
Conclusion
This comprehensive guide has provided a roadmap for navigating Microsoft Excel 2003 with confidence and proficiency. From fundamental features to advanced functionalities, you’re now equipped to maximize your productivity and streamline your data management tasks. Excel 2003’s power is at your fingertips – use it wisely to elevate your spreadsheet game.
FAQs
Q: Is Microsoft Excel 2003 still relevant today?
While newer versions exist, Excel 2003 remains relevant for users who appreciate its simplicity and efficiency. However, consider upgrading for access to the latest features and security updates.
Q: Can I use Excel 2003 on newer operating systems?
Compatibility may be an issue on newer operating systems. Explore compatibility modes or consider upgrading to a more recent version for optimal performance.
Q: How do I unlock advanced features in Excel 2003?
Delve into the “Window Menu” for advanced options like “New Window” and “Compare Side by Side,” allowing you to navigate and analyze data with precision.