The File Menu in MS Word 2003 serves as the gateway to various essential functions for managing documents efficiently. From creating new documents to saving, printing, and accessing document properties, each option plays a crucial role in document management. Let’s explore the key features of the File menu and how they can streamline your workflow in Word 2003.

Table of Contents
New (Ctrl+N):
When you want to open a new File Menu in MS Word, you can open a new file by using the New option in the File menu. You can also use the shortcut button.
Open (Ctrl+O):
File Menu in MS Word With this option you can open the saved file. That is the file that you have already created with a name. To open that file again, clicking on the open option will show a dialog box. Select the drive or directory in which the file is present from the Look in drop-down list.
The names of the files will appear in the window below, select any one of those files and click on the open button. Or double-click on that name. Or by typing the name of the file in the file name box, click on the Open button that you want to open. Select the type of file you want to open from the drop-down list of File of Type. And if you want to see the name of each type of file in Windows. So select All files from the same drop-down list.
Close (Ctrl+F4):
File Menu in MS Word 2003 uses this to close the open file. If any kind of change has been made in the open file. So while closing it, the option of Yes or No will be shown to save the computer. By doing yes, the changes made will be saved. And by doing No, without saving it will be close in the old form.
Save (Ctrl+S): File Menu in MS Word 2003
Use this option to save the opened file menu in MS Word 2003. If the file is not there then the dialog box will open as soon as you click on Save. From the Look in the drop-down list, select the drive or directory in which to save the file.
Then type a new name in the File name box. Select that style from the drop-down list of save as type. The type of file to be created. After that click on save the file will be saved.
Save As (Ctrl+Alt+S):
Save as option File Menu In MS Word 2003, you can create a copy of the opened file with another name. The newly created file will open. And the old file will be closed.
Save As Web Page:
In Microsoft Word 2003, the “Save As Web Page” feature under the File menu facilitates converting documents into web-friendly formats. This option allows users to create HTML versions of their documents, making them accessible on the web. By choosing this option, users can ensure compatibility across various platforms and share their content seamlessly online. Let’s delve into how to utilize this feature effectively within Word 2003.
File Search: File Menu in MS Word 2003
It is used to know about any word. How many files is it in? After clicking on it, the task pane will come on the right side. In which write that word in the box of the search text. Select that drive directory from the drop-down list of search in.
In which to open the present file. After this select the file type from the result should be a drop-down list click on the Go button. The names of all the files in which this word is present will appear. The name of the file appears in the search task pane.
Permission:
Under this, through the option present, certain people can be permitted to view the document and make changes to it. And if you want to end the permission given, you can terminate it.
Method- Click on Do not distribute under the permission option in the File menu. A dialog box named permission will come up. In which click on the check box of Restrict Permission to this <file type>. After this, in the box of read and change, write the name and e-mail address of the person to whom you want to give permission. After that click OK to save your document. So that those whom we have distributed get permission.
Note- This option can be used by (IRM) Information Right Management. Because it prevents sensitive documents and email messages from being forwarded and copied by unauthorized persons.
Note- Windows Right Management client is required to be installed to use IRM.
Versions:
Use it to save it by writing a comment related to the data saved on different dates in your file. Then later on make changes in the date-wise saved data according to your needs. It can also be called this. Those versions are used to save their document date/day-wise and to edit only as per their requirement. On clicking this, the following dialog box will open.

In this, by clicking on save now, you can write a comment related to that paragraph of the document in which the cursor is. So that later whenever you want to make changes in the saved paragraph, date-wise, you can do it. By clicking on this option, open date/day wise, by clicking on the comment present in it. The same paragraph will open in front of you on a new screen. In which you can make changes as per your wish.
Web Page Preview
The file opened by this option can be viewed in Internet Explorer by making a .html file.
Page Setup:
By this let’s set up the page. On clicking this, the dialog box shown below will appear.
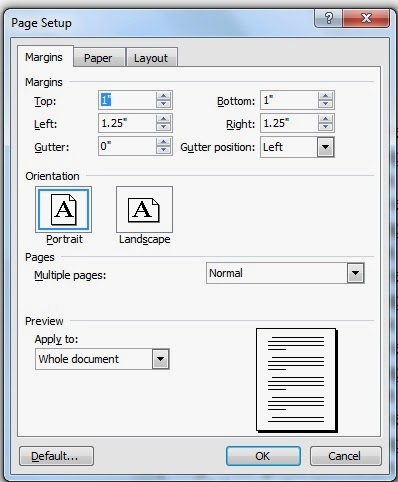
- By clicking on the Tab Button of Margins, by the option present inside it, you can fix the place for Margin and Header and Footer on all sides of the page.
- By clicking on the tab button of the paper, by the option present inside it, you can fix the size and orientation of the page i.e. in length or width.
- Layout By clicking on this Tab Button, you can bring a line or borderline number around the page by the option present inside it. Apart from this, writing from the top, bottom, or middle of the page fixes these things. By clicking on it, the dialog box shown above named Page Setup will appear.
Clicking on the push button of the line number will open the dialog box shown below. All the options below will run only after selecting the check box of Add line numbering.
- In the Spinbox of Start at, write the number with which you want to key the line number.
- The distance between the text and the line number will be as many inches as you fix in the spin box of the From text. The range of this distance is from 0″ to 22″.
- The next number will come after the number of lines given in the spin box of Count by.
- Selecting the Restart radio button on each page will result in the number starting from the beginning on all pages.
- By selecting the Restart radio button of each section, the number will start from the beginning of each section.
- By selecting the Continue radio button, the numbers will keep coming in sequence.
If the border is to be brought around the page, then clicking on the push button of the border in the page setup dialog box will open the lower dialog box. Through the option present in it, you can make the line, design border, and background of the paragraph colored as per your wish.

Print Preview:
In the File Menu in MS Word 2003, the “Print Preview” feature within the File menu allows users to preview their documents before sending them to the printer. This option provides a visual representation of how the document will appear on paper, including page layout, margins, and formatting. By utilizing Print Preview, users can ensure that their documents are formatted correctly and make any necessary adjustments before printing, thereby reducing waste and ensuring quality output. Let’s explore how to use this invaluable feature within Word 2003.
Print (Ctrl+P): File Menu in MS Word 2003
In the File Menu in MS Word 2003, the “Print” function (Ctrl+P) within the File menu enables users to produce physical copies of their documents. By selecting this option, users can configure printing settings such as number of copies, page range, and printer selection. This feature ensures that users can easily generate hard copies of their documents for various purposes, enhancing accessibility and convenience within Word 2003. Let’s explore how to utilize this printing functionality effectively.
Send to:
Under this, you can send your file on the internet through the option present. At the bottom of which is Microsoft PowerPoint. Through this, you can send the present file to PowerPoint. Which is one of the programs of MS Office.
Properties:
Write all the information related to your file menu in MS Word 2003. On clicking on it, the following property bar will appear. In which the details related to the file will be present. Apart from this, if you want to write short information related to the file, then you can write by clicking on the Summary Button. Apart from this, by clicking on the tab button present in it, you can get information related to the file.
Exit:
You can close the program by exiting under File Menu in MS Word 2003. If the file is not saved then the option to save will come before closing the file.
Conclusion
Navigating through the File menu in MS Word 2003 offers users a plethora of options for managing their documents efficiently. From creating new files to fine-tuning page layouts, and from previewing prints to sharing documents seamlessly, the File menu provides a comprehensive set of tools to enhance productivity. Users can easily access these features through intuitive shortcuts and dialog boxes, streamlining their workflow and ensuring smooth document management.
FAQs
Q: How do I open a new file in MS Word 2003?
You can open a new file by selecting the “New” option in the File menu or using the shortcut Ctrl+N.
Q: How can I save a document in MS Word 2003?
To save a document, click on the “Save” option in the File menu (Ctrl+S). You’ll be prompted to choose a location and provide a filename for the document.
Q: How do I send a document to PowerPoint from MS Word 2003?
Under the “Send to” option in the File menu, select “Microsoft PowerPoint” to send the current document to PowerPoint for further editing or presentation.