
All the options present View Menu in MS Word 2003 are related to the page. That is, changing the mode of the page, and bringing the toolbar to the page as per your wish. Write a note at the top and bottom of the page. Spread your page across the screen etc.
Normal:
By running this option, you can only write on the page. Cannot create objects etc. And if the object is already created. So it won’t be visible.
Web Layout:
View Menu Running this option in MS Word 2003 will show the page as an Internet File. Web Layout View is designed to let you see how your documents will look when used online. There isn’t much to say about the way it looked. It is provided for those who intend to publish their Word documents online.
Print Layout: View Menu in MS Word 2003
By running this option, the page will appear in the same form as the print will come out. For this, usually work in this layout.
Reading Layout:
In this view, every page of the document will keep coming in front of you by scrolling. Which makes the document easy to read.
Outline:
By running the Outline option in the View Menu in MS Word 2003, a square sign will appear at the beginning of each paragraph. On which you can move the paragraph up and down by moving the mouse. That is, it can also be said in the language of computers. Wherever you press enter, it will bring up the paragraph.
Task Pane:
This option is used to bring and hide the task pane. The task pane is on the right side of the word screen. Which varies according to the option.
Toolbars:
View Menu In MS Word 2003, all the toolbars come under Toolbar. Which of these toolbars to bring? You can bring it up by clicking on it. And if you want to remove it, you can also remove it. All details are below.
- Standard toolbar: The most used option in this toolbar is in the form of an icon. Like- New, Open, Save, etc.
- Formatting: All the facilities related to paragraphs and text are present in this toolbar. For example, creating a heading for an article, setting a paragraph, and selecting the font style and size of the text.
- Auto Text: Some made-up words are present in this toolbar. On which of them, the same word will come in place of the cursor?
- Clipboard: In this toolbar, the copied or cut thing is present in the form of an icon. By clicking on that icon, the copied or cut item will come to the page.
- Control toolbar: In this toolbox, there is a command button, an option button, a check box, a text box, a label, etc. Whichever one you click on will come. Now as soon as you double-click on it, the visual basic program will open. Where you can make this button usable by coding. And if you want to write something on the page by bringing the button as a design. So right-click on it with the mouse, and the option bar will open. Then the option list in which the option will be present in the name of this button. Under that, there will be an option named Edit. By clicking on this you can write a design in this button.
- Database: In this toolbar, there are options related to making any kind of change in the records that have been prepared in the Access program. Create a record in the field by opening the Access Program. After that copy the entire record. Or copy by clicking on the name with which the copy has been prepared and paste it into MS Word. This is how the field will appear. Now inserting a new record in this field, increasing the name of the field, deleting any record, etc. Such changes can be made through the option present in the following database toolbar.
- Forms: Table, Frame, Check box, etc. can be brought through this toolbar.
- Frames: Through this toolbar, you can bring a frame to the page.
- Picture: You can increase or decrease the color of the photo brought by this toolbar.
- Reviewing: In this toolbar, there are options related to comments. By whom you can bring comments? You can make changes in the brought comments.
- Visual Basic: In this toolbar, there are options related to the Visual Basic program.
- Web: Through this toolbar, you can open the file on the Internet.
Ruler: View Menu in MS Word 2003
In the View Menu in MS Word 2003, access the Ruler through the View menu. The Ruler offers a visual guide for adjusting margins, setting tabs, and enhancing document layout precision. Navigate to View, check Ruler, and unveil a powerful tool for precise formatting and alignment in your Word documents.
Document Map:
By creating this frame, only the list of headings will be shown on one side. The article of the heading you will click on will appear on the screen. Click on the same option again to turn it off.
Thumbnails:
In View Menu in MS Word 2003, find Thumbnails in the View menu. Enabling Thumbnails presents a visual preview of document pages, simplifying navigation and document overview. Access this feature by selecting View, then Thumbnails, enhancing document management and quick access to specific sections within your Word file.

Header and Footer:
In MS Word 2003, locate the Header and Footer under the View menu. Accessing this option allows users to customize the top and bottom sections of each page. Enhance your document’s professionalism and organization by easily adding vital information such as page numbers, titles, and dates through this View menu feature.
Footnotes:
Through this option, you can see the cow note given about any word or paragraph.
Method: To run this option, click on the Footnote option under Reference in the Insert menu. The following dialog box will open. Which, through the present option, we fix the space on the page to write a note about the article.
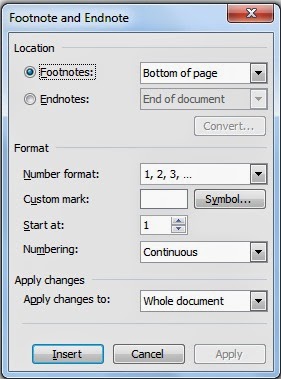
- Footnote: Click on this radio button, the place for writing notes is fixed at the bottom of the page.
- Endnote: By clicking on this radio button, the place for writing a note is fixed at the bottom of the article.
- Auto number: By clicking on this radio button the numbers for the note will come in sequence. Like- 1,2,3,4,5,6,7,8, etc.
- Custom Mark: By clicking on this red button, you can type any sign you want through “Keyboard”. Like- A, B, C, etc.
- Symbol: On clicking this, a dialog box with a symbol will open.
Markup:
Markup is accessible through the View Menu in MS Word 2003. Enable Markup to view comments, revisions, and annotations, facilitating collaborative editing and feedback. This feature enhances document collaboration by providing a comprehensive overview of changes and comments made by multiple contributors, streamlining the editing process.
Comment:
View Menu In MS Word 2003, you can see the comment given by the comment option. This option will be activate when you write a comment about something by click on the comment option in the Insert Menu. Now use the above option to see this written comment.
Full Screen:
Access Full Screen mode via the View Menu in MS Word 2003. Activate Full Screen for a distraction-free writing environment, maximizing focus on your content. Ideal for immersive editing and reviewing, this feature optimizes the viewing experience, eliminating unnecessary toolbars and menus, allowing you to concentrate solely on your document.
Zoom: View Menu in MS Word 2003
View Menu In MS Word 2003, you can enlarge your page by zoom option. If you want to bring the zoomed page as normal, then click on 100% Your page will become normal.
Conclusion:
In the View Menu in MS Word 2003 offers an array of options that significantly impact the visual presentation and editing experience of documents. From standard modes like Normal, Print Layout, and Web Layout to specialized views like Reading Layout and Outline, users can tailor their environment for optimal document creation and review. Toolbars, such as Standard, Formatting, and Database, enhance functionality and customization. Features like Ruler, Thumbnails, Header and Footer, Markup, and Full Screen provide nuanced control, streamlining tasks and improving collaboration.
FAQs:
Q: What is the purpose of the Markup feature in Microsoft Word 2003’s View menu?
Markup in Word 2003’s View menu displays comments, revisions, and annotations, streamlining collaborative editing and providing a comprehensive overview of document changes.
Q: How can I customize the top and bottom sections of each page in MS Word 2003?
Locate the “Header and Footer” option under the View menu. This feature allows easy customization of page tops and bottoms, including adding page numbers, titles, and dates.
Q: What is the purpose of the Full Screen option in MS Word 2003?
The Full Screen option, accessible through the View menu, provides a distraction-free writing environment by maximizing the content view and eliminating unnecessary toolbars and menus