Microsoft Word 2003 is one of the best programs of MS Office. Microsoft Word 2003 is a word processing program that is widely used by students and professionals alike. It is a powerful tool that offers many features including spell-checking, grammar-checking, and even automatic document formatting. It’s also a great way to organize your thoughts and ideas before writing them down.
Of these, MS Word is one such program. In which all kinds of work can be done. Like Printing, Designing, Company Records, Salary Slip, etc. That’s why this program is of exceptional importance without its features. Which this program is used somewhere in the office of almost the whole world, whether it is related to any department.
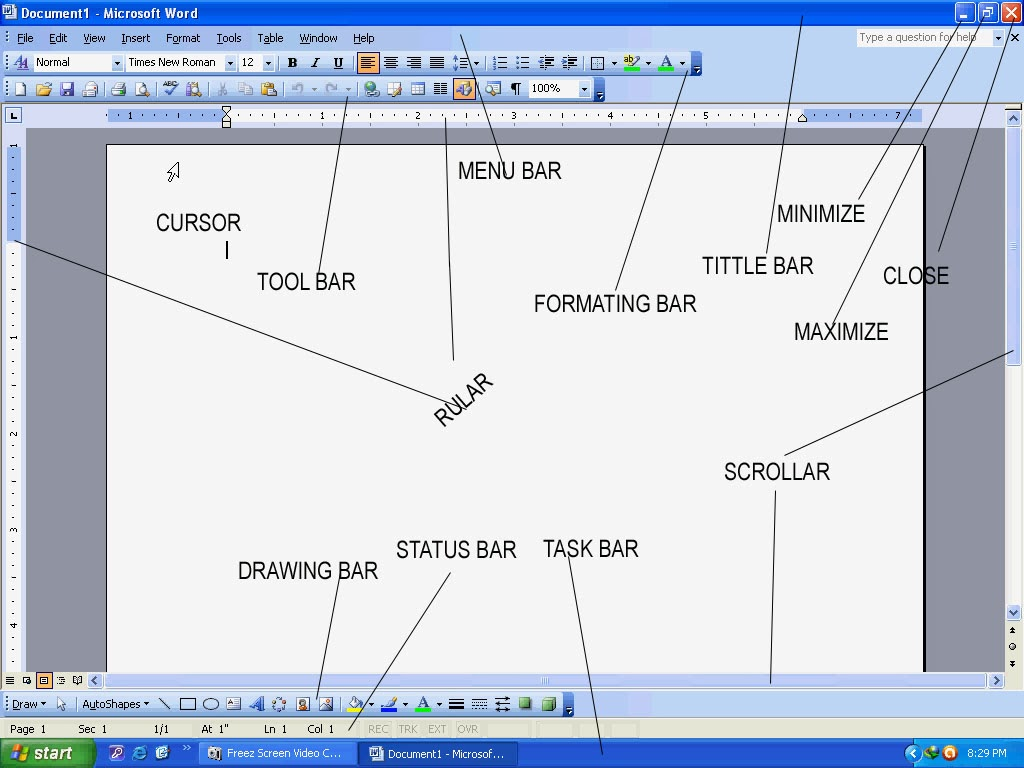
How to Open Microsoft Word 2003:
To open Microsoft Word 2003, first click on the Start Button and click on Program Option. The list of programs will appear in front of you. In which the screen shown below will appear as soon as you click on Microsoft Word 2003. Now we will explain each part that appears on the screen and its working in detail.
Title Bar:
In Microsoft Word 2003, the name of the program and file is on the left side of the title bar. The title bar is the area at the top of the page where the title appears. On the right side, there are Minimize, Maximize, and Close buttons.
- Minimize: In Microsoft Word 2003, the program is minimized and placed in the taskbar as an icon. Then click on that icon again to open the program. This way, we can minimize and keep many programs in the taskbar.
- Maximize: By Maximize in Microsoft Word 2003, you can expand the program to the entire screen.
- Close: Through this, the program opened can be closed. If you haven’t saved your file Then a popup to save will come, if you want to save the file by doing Yes. Otherwise, skip by doing No.
Standard Tool Bar:
This toolbar is below the Formatting toolbar. It has different types of options in the form of icons. If you want to open a new file, you can open it by clicking on the New icon. Similarly, you can print a preview and print out the page. You can also save the file.

Formatting Tool Bar:
In Microsoft Word 2003, you can select the font style of your choice. You can make the font size as promised or as small as you want. You can set the paragraph. You can change the font color etc. Fonts can be bold, italic, and underlined.

Ruler:
This is a scale-like bar from which you can see the margins and tabs of the page. And from this, you can increase the decrease. From here you get to know the setting of the Paragraph and page.
Document Area:
The page on which you write or make a design. This is called the document area. Whenever you have to write something or make a design, then you open a blank page. and start writing. If you click on the page. And you can start writing from where the cursor is visible.
Scrollbar:
Through this, you can move the page up, down, right, left. There are usually two scroll bars on a page. The vertical that is on the right side of your page, you can slide the page up and down. And with the second horizontal, you can slide the page to the right and left.
Status bar:
All the details of the page are visible in the bar above the taskbar, its detail is given below.
- Page: The line number of the page on which the cursor will be will be shown here.
- Sec: To view the part of the document. This is when we have to divide the document into many parts through the page break option in the insert menu. So it will show the number of the same part in which the cursor will be there.
- 1/1: How many pages are there in total? And on which page is the cursor? See that number.
- At 1″: At what distance is the current line from the beginning of the page? It shows.
- Ln1: The number of the line in which the cursor will be will show.
- Col 1: Will show the number of letters from the left side.
- REC: The Record Macro option is a symptom of being turned on.
- TRK: The Track Change option is a symptom of activation.
- EXT: Extend selection After turning it on, wherever you click on the article, it will be selected. It will be activated when double double-click on it. After it is enabled, only the article can be selected. Can’t write
- OVR: Over type mode where the cursor will be, without erasing the text beyond what we write will keep changing. It will be activated when we press the INSERT button.
- WHP: Word help mode is a symptom of being started.
Drawing Tool Bar:
In Microsoft Word 2003, there are many options related to text and boxes in the drawing toolbar. With which different types of changes can be made in text and box. Clicking on Draw on the left in this bar will show a chart. Which has the following options.

- Group: Through this option, you can create a group by selecting many objects.
- Ungroup: By this option group objects can be separated.
- Regroup: Through this option, ungroup objects, etc. can be grouped again.
- Order: Under this, there are the following options.
- Bring Front tow: By this option, the select object can be brought up.
- Send to Beck: By this option, the select object can be brought down.
- Bring Forward tow: With this option, the selected object can be brought up one by one in sequence.
- Send Backward: The objects selected by this option can be lowered one by one in sequence.
- Bring Forward two of text: By this option, the select object can be brought above the text.
- Send Tow Behind Text: The object selected by this option can be placed below the text.
Grid:
In Microsoft Word 2003, you can bring grid lines on the page through the insistence option.
- Nudge: The select object can be moved from top to bottom right left. This work can also be done through Arrow Key.
- Align and Distribute: On clicking this option, a bar will open. In which the above options will start only after clicking on the bottom option Relative to page. By which the select object can be moved to the top-right-left of the top of the page.
- Rotate or Flip: By this, you can rotate the selected object as per your wish.
- Text wrapping: It is used to place the object in the article as per its wish. So that the text uses how the variables come around the object.
Reroute Connector:
In Microsoft Word 2003, under the drawing toolbar, the long connector line between two objects will be shortened by automatically adding shortcuts. It will start when we make two or more boxes inside the drawing canvas area and connect them through the connector line.
Method: On selecting any object from the drawing toolbar, a box with a cut line will appear on the page. Which is called the drawing canvas area. Right-clicking on this box will open a bar of options. Clicking on the Show Drawing Canvas toolbar will bring up a toolbar named Drawing Canvas. The setting of the canvas area can be done by the option present in it.
- Edit Point: By this, you can bend the line as per your wish.
- Change Auto Shape: Through this option, you can change the selected box in a different design.
- Set Autoshape Defaults: By filling in the box color and clicking on this option, now whenever you make a box, the same color will always come.
- AutoShapes: Clicking on this will open a bar with different shape names. In which the designs related to different shapes are present. By clicking on which of these shapes you will draw on the page, then the object will be prepared in the same form.
Taskbar: Microsoft Word 2003
In Microsoft Word 2003, this bar has the Start button on the left. By which we can open the program. Minimize the open program and keep it in the taskbar as an icon. And you can open it by clicking on that icon again. In this bar on the right is the clock. You can change the time and date by double-clicking on it.
Note: To link more than one text box and move the box in a different direction. The following uses the Toolbox tool. If this tool is not shown when you create a text box, then you can turn on the tool by clicking on the text box under the Toolbar option in the View menu.
Menu Bar:

In Microsoft Word 2003, this bar contains various menus. There are many options under all menus. Which can be run by clicking with the mouse. Read all menu details carefully in the next post.
Conclusion:
Microsoft Word 2003 remains a significant and widely used word processing program, appreciated for its versatility and feature-rich interface. From basic document creation to complex designs, it serves various purposes in offices worldwide. The program’s user interface is composed of essential elements like the Title Bar, Standard Toolbar, Formatting Toolbar, Ruler, Document Area, Scrollbars, and Status Bar, each playing a crucial role in creating and formatting documents efficiently. The Drawing Toolbar adds a layer of customization with options for creating and modifying shapes and drawings.
FAQs:
Q: How do I open Microsoft Word 2003?
To open Microsoft Word 2003, click on the Start Button, navigate to the Programs option, and select Microsoft Word 2003 from the list.
Q: What is the purpose of the Drawing Toolbar in Word 2003?
The Drawing Toolbar in Word 2003 is used for creating and customizing shapes, drawings, and text boxes. It provides options for grouping, ungrouping, aligning, distributing, and more.
Q: How can I format text in Word 2003?
Text formatting in Word 2003 can be done using the Formatting Toolbar, where you can select font styles, adjust font size, set paragraph formatting, change font color, and apply bold, italic, or underline styles.