Any document or project must have an eye-catching and well-organized Table Menu in Microsoft Word 2003 offers an adaptable framework to make that happen. We’ll walk you through the process of creating a table that not only suits your style choices but also improves accessibility and readability in this step-by-step tutorial.
Learning how to create a Table Menu in Microsoft Word 2003 can improve the look and feel of any document you work on, be it a project report, restaurant menu, or anything else. Join us as we explore the crucial actions and functionalities to fully utilize this vintage Microsoft Word version for producing elegant and eye-catching table menus.
Table of Contents
Draw Table:
Create a polished Table Menu in Microsoft Word 2003 with ease. This concise guide walks you through the steps to craft professional tables, enhancing the visual appeal and organization of your documents. Elevate your projects, be it a restaurant menu or a business report, by mastering the art of table creation in this classic version of Word. Follow along and unlock the potential of Microsoft Word 2003 for creating visually appealing and well-structured table menus.
Insert:
You can bring tables through this option under Table Menu in Microsoft Word 2003. You can increase the column, row, and cell in the table. Under it are the following options.
- Table: On clicking this option, the dialog box will open in MS Word. In which ok by giving number in the box of column and row. After doing ok the table will appear on the page.
- Column to the left: By this option the column in which the cursor is. You can expand on the left side of that column.
- Column to the Right: By this option the column in which the cursor is. You can expand on the right side of that column.
- Row Above: By this option the row in which the cursor is. On top of that row, new rows can be increased.
- Row Below: This is the row in which the cursor is. Below that row, you can grow new rows.
- Cell: With this option, you can increase the cell from right, left, up, and down.
Delete: Table Menu in Microsoft Word 2003
Through Delete, you can delete tables, columns, rows, cells, etc.
- Table: To delete the table, first select the table and then click on this option, your table will be deleted.
- Column: If you want to delete any column. So select that column and click on the delete column. You can also delete by right-click with the mouse.
- Row: To delete any row, you can select that row and delete it by clicking on delete row.
- Cell: To delete any cell, you first select the cell. Then delete it. Or press the right mouse button and click Delete.
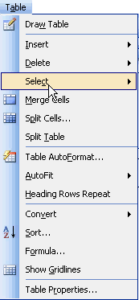
Select:
Effortlessly design your Table Menu in Microsoft Word 2003 with this concise guide. Learn to select and format tables for a professional and polished look. Elevate your documents, whether it’s a restaurant menu or business report, by mastering table creation in this classic version of Word. Follow these simple steps to select, customize, and enhance the visual appeal of your Table Menu, ensuring a seamless and attractive document of your content.
Merge Cells:
Learn how to merge cells in Table Menu in Microsoft Word 2003 to streamline. With the help of this brief tutorial, you can quickly merge and format cells to create a layout that is neater and more structured. Discover how to effortlessly combine cells to create a professional appearance on any document, including company reports and restaurant menus. By following these simple steps, you can improve the presentation of your document and make sure that your Table Menu is clear and sophisticated.
Split Cells:
Split cells, through this option, the cell can be divided into several parts. By clicking on the Split Cell option, the dialog box will open. In as many numbers as you give in the column and row box, the same number of columns and rows will come in the cell in which the cursor is.
Split Table:
With this option, Table Menu in Microsoft Word 2003 the table can be divided into pieces. Where to detach the table. Click on this option by placing the cursor in that row, from there the table will be separate.
Table Autoformat:
Through this option, you can take the design made in the table. There are many designs in it. You can check all the designs by clicking on it. And then you can click on the one you like and insert it.
Auto Fit:
Effortlessly enhance your Table Menu in Microsoft Word 2003 with the Auto Fit feature. Learn to automatically adjust cell sizes for a polished and well-organized document. This quick guide ensures your tables present information seamlessly, providing a professional touch to your restaurant menu or business report. Streamline your workflow with this essential Word 2003 tool.
- Auto fit to content: Table Menu In Word 2003, the column in which the text will be present. Use this option to make that column equal to itself.
- Auto fit to Window: Through this option, all the columns can be spread across the screen.
- Fixed Column Width: By this, we fix the width of the column. That is, the width of the column will not increase on writing.
- Distribute rows evenly: By this option, all the rows can be made equal.
- Distribute columns evenly: By this option, all the columns can be made equal.
Convert: Table Menu in Microsoft Word 2003
Convert, the text selected by this option can be converted into a table in Table Menu in Microsoft Word 2003. And the text in the table can be passed out of the table as a paragraph. Full details of this option are under MS Excel.
Sort:
Through this option, the entries made in the paragraph field, etc. can be done in sequence. The advantage of the sort option is that the file contains multiple names, addresses, numbers, etc. And want to sort all the number of names that start with A. Let that be one place. So to do this use this option.
Formula:
By this option, all the related work is done accordingly. The following dialog box will open as soon as you click on it under Table Menu in Microsoft Word 2003. Where in the formula box, you can add, divide, multiply, etc. by using the formula as per your wish. To enable this option, first click on the table in the insert option under the table menu.

And prepare the table as per your wish and prepare the record in it like this. Now the program will automatically decide the column and row names like this. This name is call column heading and row heading in the language of the program. But this column will not be visible in the row heading table, it is create just for the sake of explanation. Because you have to give the address of the cell while using the formula according to this heading.
Hide Grid lines:
Perfect your Table Menu in Microsoft Word 2003 by hiding gridlines for a sleek, professional appearance. This quick guide shows you how to effortlessly remove gridlines, allowing your content to shine without distracting lines. Elevate your document’s visual appeal and presentation by following these simple steps in Word 2003.
Table Properties:
You can set the table in the article through the Table Properties option under Table Menu in Microsoft Word 2003. On click this, a dialog box will open. where we check this. Click on that on the top left and right side of the table article. The table will appear in the article the same way.
Conclusion:
Mastering Table Menu in Microsoft Word 2003 not only enhances the aesthetics of your documents but also improves accessibility and readability. From drawing and formatting to merging cells and hiding gridlines, this comprehensive guide empowers you to craft visually appealing and well-organized table menus. Elevate your projects, whether it’s a restaurant menu or business report, by leveraging the versatile features of Microsoft Word 2003 for an impressive doculent.
FAQs:
Q: How can I create a professional Table Menu in Microsoft Word 2003?
Follow our step-by-step guide to effortlessly design and organize a polished Table Menu. Learn essential features like drawing tables, inserting rows and columns, and utilizing auto-fit options to enhance your document’s visual appeal.
Q: Can I delete specific elements within a table using Microsoft Word 2003?
Yes, the “Delete” option allows you to remove tables, columns, rows, or cells. Simply select the desired element and use the delete function to tailor your Table Menu to perfection.
Q: How do I hide gridlines for a cleaner look in Microsoft Word 2003?
Our guide provides clear instructions on hiding gridlines, ensuring your Table Menu achieves a sleek and professional appearance. Follow the steps to elevate your document’s visual appeal.