The Insert menu in Microsoft Word 2003 offers a plethora of tools to enhance document creation. Accessible from the menu bar, it empowers users to insert diverse elements seamlessly. From tables for structured data presentation to pictures for visual impact, hyperlinks for navigation, and headers/footers for document organization, this menu streamlines content enrichment. Furthermore, it facilitates the insertion of objects like charts, shapes, and text boxes, fostering creativity in document design. Leveraging this menu optimizes the layout and functionality of documents, ensuring clarity, professionalism, and engagement in Word 2003.
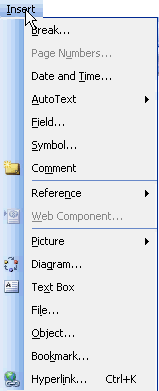
Table of Contents
Break: Insert Menu in Microsoft Word 2003
On clicking this, a dialog box will open, which has the following options.
- Page break: Where the cursor is on the page. Use this option from there to move the article to the next page. But when you delete the article from the new page, then the new page will also end.
- Column break: This option is used to move the cursor from one column to another.
- Text wrapping break: With this option where the cursor will be in the text present around the object. From there the text will move to the bottom of the object.
- Next Page: This is also like a page break. But when the articles on the new page will be deleted. So the new page will not finish.
- Continuous: After writing a column on the page, divide the written article equally in the column.
- Even page: This is also to bring a new page. But when we enter the page numbers the even number will show in series. Like- 3, 5, 7, 9 etc.
- Odd number: This is also to fetch a new page. But when we enter the page number the number will show in odd series. Eg- 2, 4, 6, 8, etc.
Page Number:
In the Insert Menu in Microsoft Word 2003, you can add page numbers through the menu. Simply click on “Insert” in the menu bar, then choose “Page Numbers.” From there, you can select the positioning and formatting options for your page numbers. This feature helps maintain document organization and provides easy reference for readers.
- Position: Fix it from its drop-down list. Whether the number comes at the bottom of the page or the top.
- Alignment: Fix it from its drop-down list. whether the number is on the right, left, or middle side of the page.
- Show number on first age: Before turning on its check box, the number will be shown on the page or else it will not.
- Format: On clicking this option button, the following dialog box will open. By which page numbers can be brought in different ways.
- Number format: Select any one from its drop-down list. which has been selected. The page number will appear in the same way.
- Include chapter number: After turning on its check box, select it from the following list. With which style number should the chapter begin? Eg- 1-1, 1.1, 1-a, etc.
- Continue from the previous section: By clicking on its Radio button, the section number will keep coming from the sequence of the previous section.
- Start at: Select the number from which the number starts from its spin box.
Date and Time:
Insert Menu in Microsoft Word 2003, after clicking on this option button, the following dialog box will open. From there you can bring the date and time in whatever design you want.
Auto Text:
A bar will open as soon as you click on Auto Text in Insert Menu in MS Word 2003. Which has the following options. You can copy the thing present in them and bring it to the page.
- Auto text: By this, you can set by writing name, etc. as per your wish. On clicking on it, the following dialog box will open. Enter the word you want to set in the box for enter auto text entries here. After that click OK by clicking on the add button. This word will reach the Normal option present under the auto text. You can click it whenever you want to bring it to the page.
- New: The text selected by this option can be set with any name.
Method: To run this, first of all, select the part of your article that you want to set. Then click on this option type the name in the dialog box and click OK. Now this name will appear in the Normal option in this bar. By clicking on it you can bring the set text to where the cursor is.
Note: All the options below are new. Whichever of them you click on, the text set in it will come to the page where the cursor is.
Field:
The dialog box that will open as soon as you click on the Field option in the Insert Menu in Microsoft Word 2003. In it, options are present for all types of information related to the document. Whichever of these you click on, the related information will come on the page.

After selecting All from the Categories list box in this dialog box, clicking on =Formula in the field name box will bring up this symbol (=). In this, the following formula can be used.
Example
- To add+like 10+10 = write ok the result will show 20.
- To subtract like 10-5 = write ok the result will show 5.
- For / division eg 10/5 = do ok the result will show 2.
- For multiplication like 10*5 = write ok the result will show 50.
Symbol:
Through this option, any symbol can be brought to the page. Bout type symbols are present under Office which can be inserted in the page if needed.
Comment:
You can write a comment through this option. It has been told about it under the view menu.
Reference:
For referencing in Word 2003, utilize the “References” option located on the menu bar. This tab offers tools for creating citations, managing sources, and generating bibliographies. It streamlines the process of citing sources and ensures adherence to academic or professional citation styles, enhancing the credibility and integrity of your documents.
Footnote:
With this option, you can write a footnote about any word. It has been told about it under the view menu.
Caption:
Through this option, you can bring his name with the number above or below the table, figure, chart, clip art, etc. Click on it will open the following dialog box. Select one of the labels made from the drop-down list of the label. And if you want to give new label as per your wish. Then you can give by following button.
Click on the New Label button will bring up another dialog box of the same name. In which ok by writing a new label. Now this label will come in the Label drop-down list. Which can be selected and brought to your page in sequence. Select the place for the label from the drop-down list of Position. whether the label should come up or down. You can delete the selected label through the Delete Label button. You can change the number style by clicking on the button of Numbering.
Click on the button of Auto Caption will bring up the following dialog box. A list of all those programs will be present in the list box of Add caption when inserting. which is loaded into your computer. Now out of these whose check box will be selected? Whenever those things are brought to the page by them, the given label will keep coming with numbers in sequence.
Cross-Reference:
Through this option, the heading, footnote, comment, etc. given on the page can be brought in sequence. So that whenever you click on the brought Heading, footnote, comment, etc. the cursor reaches that place.
Method: First of all, write an article on two or three pages and give a Heading, footnote, bookmark, etc. related to different paragraphs and keep the cursor at the bottom. After this click on this option the following dialog box will open. From the Heading, footnote, bookmark, comment, table, etc. present in this drop-down list, select the one that is present on the page.
It will appear in the for which box. Select each one of them and click on the insert button. It will come where the cursor is. Insert as hyperlink By turning on this check box, ctrl+click on the object brought will move the cursor to that place. the place where it is. Select the style in which you want the reference from the drop-down list of insert references.
Index and Table:
Through this option, you can prepare a list of all headings and tables of your file with page number.
Method- On clicking this option, the dialog box present on the next page will open, in which click on the Tab button of Table of contents. By selecting the style and page number of the list by the option present in it, do OK.
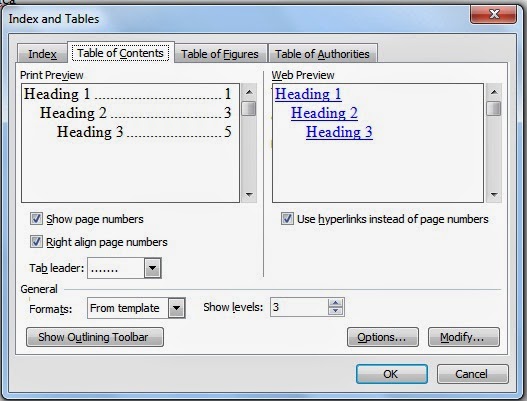
Show Page Number:
By turning on its check box, the page number will also come along with the list. After turning on the check box on the Right align the page number. You can select one of the different types of lines between the heading and page number from the drop-down list of tab leaders below. Select the style in which the list comes from the drop-down list of the format.
As many numbers as you give in the spin box of the show level, the same heading will appear in the web preview box above. It’s just for looks. Option By clicking on this button, the dialog box will open. The number on which heading will be given out of the heading present in it. That heading will appear on the same number in the web preview box. It is only about seeing.
Note: You can not give more than 9 numbers. Modify The dialog box that will open after clicking on this button. You can change the heading selected by the option present in it.
Note: To run the Index and Table option, it is necessary that whatever heading is there while writing the article. All of them are given under the heading created by the Style option in the Format menu. Then this option will automatically create a linked list otherwise not.
Picture:
Can bring clip art, pictures, etc. made by it. Under it are the following options.
- Clip art: You can bring clip art made by it.
- From File: Through this, you can bring pictures, etc. present on the computer.
- Auto shape: With this, you can bring objects made in different designs.
- Word Art: By this, you can write in different designs.
- From Scanner or Camera: Through this, you can bring pictures, etc. from the scanner and camera.
- Chart: Through this, charts can be prepared in any form.
Diagram:
You can bring the drawn diagrams made by this option. There are 6 types of diagrams in Diagram Gallery. Organization Chart Organization Chart, Cycle Diagram Cycle Diagram, Radial Diagram Radial Diagram, Pyramid Diagram Pyramid Diagram, Venn Diagram Venn Diagram, and Target Diagram Whichever of the target diagrams are to be inserted. You click on that diagram and click on ok The diagram will be inserted in your page.
Text box:
After clicking on it, you want to make the text box as big as you want. You can write in it. And with the mouse, you can pick it up and place it anywhere. This is the advantage of making it. Due to having an important part of your file box, the eyes of the people will be on the box first and they will focus on it.
File: Insert Menu in Microsoft Word 2003
Insert Menu in Microsoft Word 2003, through this, you can bring the text of another file to your file. If you already have a PowerPoint file, then you can insert it in it, the way described below.
Method: On clicking this, the dialog box will open. From where select the name of the file from which the text is to be fetched. After clicking on Insert, the article will come to the page.
Object
You can make anything from any program. Its details have been explained under the Edit Menu.
Bookmark: Insert Menu in Microsoft Word 2003
Its advantage is when we are writing a book. And there are many such pages in it. Which requires frequent visits. So let’s create a bookmark to go to those pages. On clicking this, the following dialog box will open. In the box of the Bookmark’s name, write some signs related to this page on the page where the cursor is. So that it is known that it is a bookmark of that page. After that click on add button.
A bookmark will be created with this name. In this way, you can create a bookmark by placing the cursor on the page or paragraph which you want to bookmark. All these bookmarks will appear in this dialog box. Now the page or paragraph you want to go to. After selecting that bookmark and clicking on the go-to button, the cursor will reach the same page or paragraph that will have this bookmark.
Hyperlink:
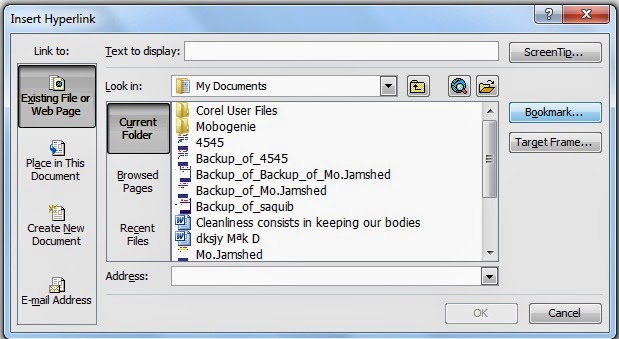
Through this, the heading file bookmarks, etc. link to the current file. On clicking this, the following dialog box will open. Browse for File By this link another file to the current file. By clicking on this button, select any file name of your choice and click OK in both places.
Doing so where the cursor is. There the name of the file will come along with its address. Now whenever you move the mouse on this name, the mouse will change to a hand. Which is a sign of the link. On which ctrl+click can open the linked file.
Note: The file you are linking to. That file should be from MS Office only.
Conclusion:
The Insert menu in Microsoft Word 2003 serves as a versatile toolbox, offering a wide array of features to enrich document creation. From facilitating the insertion of tables, images, and hyperlinks to providing options for page formatting and numbering, this menu enhances both the visual appeal and functionality of documents. Leveraging these tools optimizes document layout and organization, ensuring clarity, professionalism, and engagement in Word 2003.
FAQs:
Q: Can I customize the positioning of page numbers in Insert Menu in Microsoft Word 2003?
Yes, you can customize the positioning and formatting of page numbers by accessing the Page Numbers option in the Insert Menu in Microsoft Word 2003. From there, you can select the desired position and alignment for your page numbers.
Q: How can I insert symbols or special characters in Insert Menu in Microsoft Word 2003?
You can insert symbols or special characters using the Symbol option in the Insert Menu in Microsoft Word 2003. This feature allows you to choose from a variety of symbols or characters and insert them directly into your document.
Q: Can I add comments or footnotes to my document in Insert Menu in Microsoft Word 2003?
Absolutely. You can add comments or footnotes using the Comment and Footnote options in the Insert Menu in Microsoft Word 2003. These features allow you to provide additional context or explanations within your document.